To “move” the site, we need to update A Records in DNS for your domain to resolve to the IP address of your new hosting account. This is the same IP address we used…
In Part 3, we prepared for a Drupal website move by pushing your files up to your new hosting account, creating a hosts file entry to allow you to test your new site without impacting your live site, installing Drupal, and restoring and your database. We also covered common items to test, along with how to clear your Drupal cache. In Part 4, we’ll finalize the move by updating DNS and telling the world your website now lives at a new server.
Step 12. Update your DNS
In Step 2, all the way back in Part 1 of this series, you obtained access to your DNS account. To recap, for most of you this is probably your domain registrar. If you are unsure, please review Step 2 for some helpful screen shots. Now that you have tested your website in its new location, it’s time to adjust your DNS settings to send traffic to your new web host.
Log in to your domain registrar account (or your DNS account, if you have third-party DNS hosting) and view the DNS settings for the domain you want to point at the new hosting account. You’re looking for a screen that looks like an operator’s switchboard for your domain. You should see terms like “A Records”, “CNAME Records”, “MX Records”, etc.
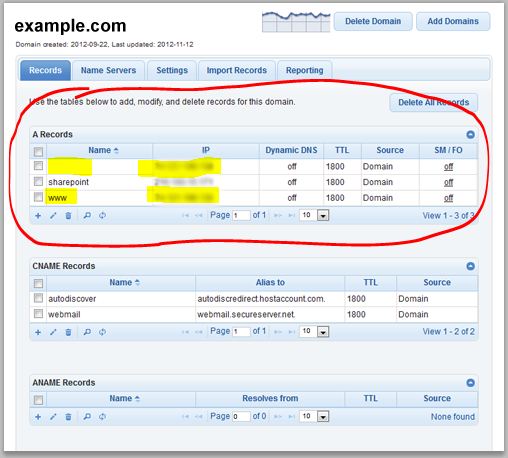
To “move” the site, we need to update A Records in DNS for your domain to resolve to the IP address of your new hosting account. This is the same IP address we used in Step 7 to configure the hosts file for testing purposes.
Tip: Take a screen capture of your DNS settings before making any adjustments.
Find the A Records section of DNS. Locate the line with an “@” or a blank name. This sets the default IP for your domain. Think of this as what happens when you don’t enter the “www” in the URL for your domain, e.g. http://example.com. Update the IP on this line to the IP for your new web host. This is the same IP address you used in your local hosts file entry.
Repeat this process for the A Record named “www”. This routes requests for http://www.example.com to the correct IP address. Update the IP address for this line using the same value you used for “@”.
Save your changes. DNS propagates across the web quickly. Your change will gradually make its way from DNS server to DNS server in the next 24-48 hours, however the vast majority of those on the web will see your new website within 6-8 hours.
Step 13. Remove your Hosts File Entry
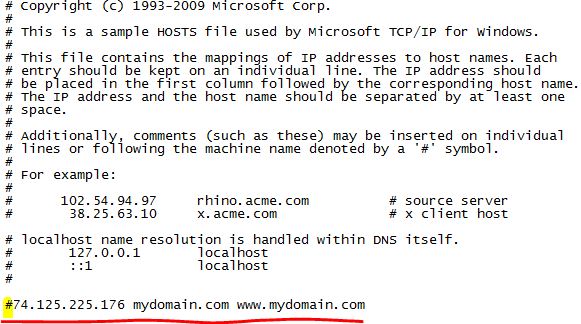
The easiest way to undo the changes you made to your hosts file during testing is to “comment them out”. A comment in the hosts file is preceded with a “#”. Comments are ignored by the computer. So open your hosts file and put a “#” in front of the line you added in step 7. Click save and you are done.
You won’t see the results of your new DNS entries immediately, but there are things you can do to speed up the process.
1. Close all open browsers and start a new browser session. This step will encourage your web browser to update its DNS cache.
2. Ping the domain name to determine which IP address it resolves to. You want to see the IP address of your new web host. Here’s a quick how to on using the ping command: http://www.wikihow.com/Find-a-Website%27s-IP-Address
With preparation, most Drupal-powered websites can be moved in less than a day without heartache, by anyone with a basic understanding of web terminology and tools, and the willingness to take the time to follow the process outlined in this series of articles.


